A wooden swing is a wonderful addition to any garden.
Imagine it – a sunny afternoon, gently rocking back and forth, with a good book and glass of wine in hand. Not only are they more relaxing than a traditional bench, they look lovely too. But ready-made varieties can be a little on the expensive side!
So, why not have a go at making your own?
With a few lengths of timber and some high-quality rope – courtesy of RopesDirect – it’s not as difficult as you might think. Especially with the help of our handy step-by-step guide!
What will I need to make a wooden garden swing?
- Synthetic Hemp Rope (We recommend 18-24mm)
- Soft timber wood
- A circular saw
- Pocket hole screws
- Wood glue
- Eye bolts
- Paint or wood stain
- Outdoor sealing varnish
- Spirit level
4 steps to make a wooden bench swing
- Build the base
First things first, cut all the pieces required to create the base of the wooden swing seat.
This includes:
- 5 long boards for the support joists (approximately 53cm long)
- 5 long boards for the back supports (46cm)
- 2 long boards for the back and front aprons (183cm)
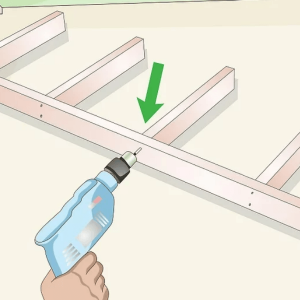
Start the build by attaching the support joists to the front apron. Both the joists and the apron should be standing up on their sides. The joists need to be spaced around 38cm apart, and the first and last joists should be flush with the edges. Secure in place using screws and glue.
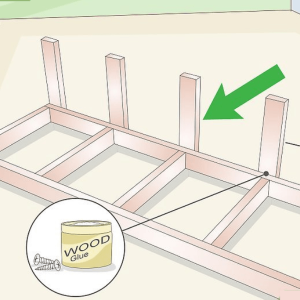
Then, attach the back apron – also using screws and glue. And to complete the base, affix the back supports, taking care to leave an approximate 33cm gap between each.
- Add the armrests and slats
Again, begin this next step by cutting all the necessary pieces. This includes:
- 2 long boards for the armrests (approximately 28cm long)
- 2 long boards for the arm fronts (28cm)
- 6 slats (183 cms long, 15 cms wide, 2.5cm thick)
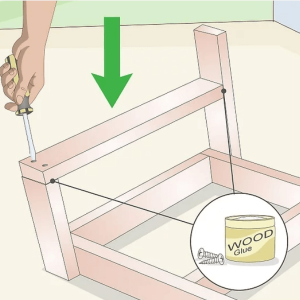
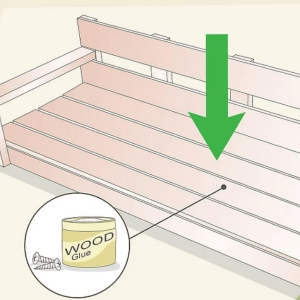
Attach the arm fronts to the front apron, ensuring that the bottom edge of each is aligned with the bottom edge of the apron. Position and join the armrests, using a spirit level to check they’re perfectly straight. Then, to finish your basic wooden garden swing seat, affix two slats to the backrest and the remaining four to the support joists – leaving a 1-2cm gap between each.
At each stage, once again, use pocket hole screws and wood glue to secure everything in place.
- Paint and treat the timber
Now your wooden bench swing is fully built, the next step is to treat the timber.
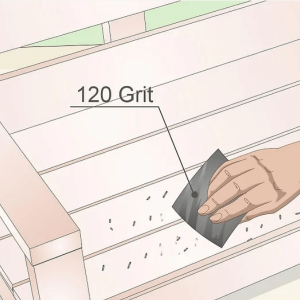
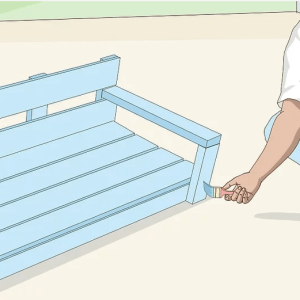
Smooth the surface with sandpaper (if necessary), taking care to sand in the direction of the wood grain – not against it. To preserve the natural texture of the wood, apply a wood stain. Or if you’d prefer a solid colour, cover the entire surface with durable outdoor wood paint.
Then, to ensure it’s as weather-resistant as possible, seal the wood using a waterproof varnish.
- Attach the rope
Lastly, you will need to fasten the rope to the wooden garden swing.
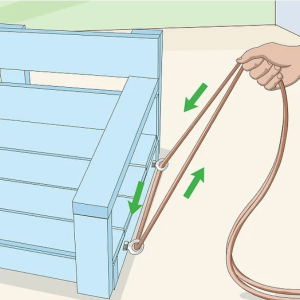
The easiest way to do this is using eye bolts. Drill two holes all the way through the right-hand joist. Place a washer over each hole, then a nut and twist the eyebolts into place. Secure each using a washer and bolt on the other side, before repeating the process for the left-hand joist.
Ensure the looped section of each bolt is orientated vertically.
To hang the swing, feed a length of Synthetic Hemp Rope through both loops – on each side – and tie the ends together using a sturdy knot. Ensure your tree branch or pergola can support the weight. Then wrap the spare rope around its circumference several times and tie it securely.
Alternatively, you may wish to use heavy-duty swing hangers.

Sound a bit too complex?
This DIY wooden swing really is very easy to make – even for a beginner. But if woodwork isn’t your strong point or you simply don’t fancy taking on such a big project, don’t worry. There are other ways to introduce this popular feature to your garden.
For example, here at RopesDirect, we sell a variety of ready-made wooden rope swings.
These are supplied pre-fitted with steel rings at the top. Which means, to install them, you just need to wind an extension rope around the tree branch and connect the swing using a quick link. To help, we’ve also created a step-by-step guide – with a clear, helpful diagram – and a fantastic YouTube tutorial video to show you how it’s done.
Or, for something a bit different, perhaps you could have a go at making a hammock instead? Hammocks are another lovely addition to a garden. And again, we’ve created a brilliant ‘how to’ guide – which explains how to knot one up in just a couple of hours.
Whichever option you decide upon, we ask just one thing – be sure to send us a couple of photos of the final results! We always love to see our ropes in action and will post them on social media, to show other customers just how easy it is to make their own! Either send a few pics of your wooden swing via email to info@ropesdirect.co.uk or tag us on Facebook using @RopesDirect.

