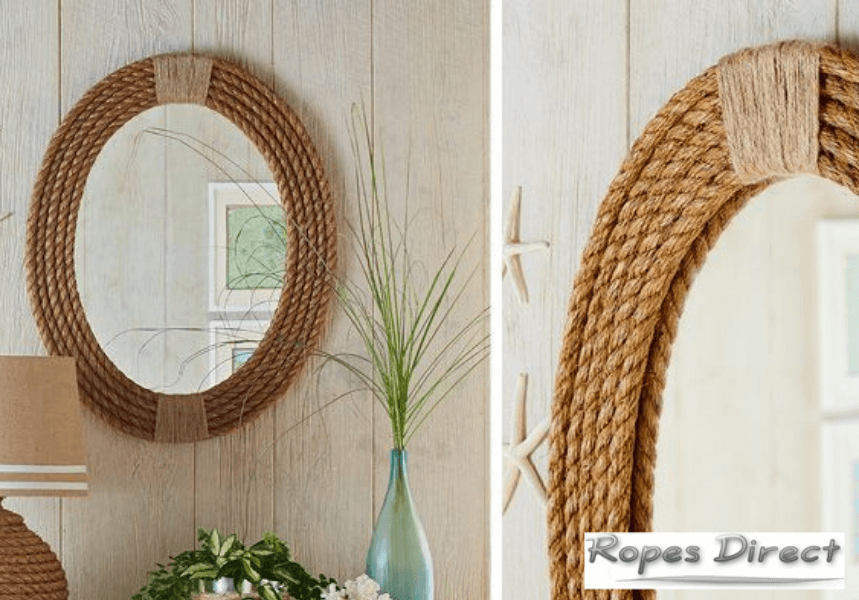
Rope mirrors are everywhere at the moment.
They’re a big trend on the home décor scene. But, unfortunately, they also come with a big price tag. So, why not have a go at making one yourself?
All you need is a long length of rope, some crafters’ all-in-one glue and an old mirror. Simple as that. Just put aside a couple of hours of your time, follow our step-by-step instructions and – before you know it – you’ll have created a ‘high-end’ nautical home accessory, without breaking the bank.
5 steps to make a nautical rope mirror
1. Choose a suitable mirror
The type of mirror that you choose will determine how the rope mirror is made.
If the mirror has an existing wide frame – perhaps made from wood or plastic – the rope can be stuck directly onto this surface using a strong adhesive. This is a very quick and hassle-free method. And you’ll still be able to hang the mirror using its original fastenings. But it can look a little messy.
For best results, our advice is to use a mirror with a thin frame. Or better still, remove the mirror glass from its current mount and surround and create a fresh starting point for your project.

2. Wind the rope
You’re now ready to begin. Starting from the middle, wind the rope tightly to create a neat and compact ‘spiral’ disc.
The diameter of this disc will need to be slightly bigger than the diameter of your mirror. Typically, to create a statement nautical look, we recommend adding at least six additional spirals. But the exact number will depend on the thickness of your rope – and also your personal tastes and preferences.
3. Cover the rope in crafters’ all-in-one glue
Now you need an all-in-one glue that can be used to stick, seal and finish fabrics, and can be bought in all good craft stores.
The glue is water-based and clear. So, it won’t ruin the rustic appearance of your DIY rope mirror. And it’s a really easy way to set the disc in place and ensure the spirals stay together.
Use a brush to cover the entire surface area of the rope, making sure that it gets inside all of the gaps. Then, simply leave it overnight to dry and set. Easy as that.
4. Add the mirror
The next step is to add the mirror itself. Position it in the centre of disc, taking care to leave the same number of spirals exposed all the way around its circumference. Once you’re happy, use a strong glue to secure it into place and leave for several hours until it is completely dry.
If the previous mirror frame is still visible, you may wish to cover this up. One ‘nautical-themed’ idea is to add a circle of beach shells to the perimeter of the mirror. Or, you could use a thinner piece of rope to create a contrasting inner border? The choice is yours and you can be as creative as you like.
5. Time to hang it up
To secure the rope mirror to the wall, you have a couple of options.
The first involves drilling it into place with screws. This is the best method to create a modern ‘floating’ look. The screws will be fully hidden by the rope, but will ensure the mirror is stable.
Alternatively, to accentuate its coastal style, you could hang the mirror using an additional piece of rope. To do this, insert a metal eyelet into each side of the design. Pass the rope through each eyelet and secure using a tight knot. Finally, hang it via this piece of rope from a hook on the wall.
Start your circular rope mirror today
Fancy giving it a go? Why not?
It’ll look great, it’s easy to do, and it will save you lots of money.
Here at RopesDirect, we stock many products that are perfect for this kind of project, including:
These can all be bought by the metre (to match the size of your chosen mirror) and come in a broad spectrum of diameters. Typically, we recommend choosing a 12-20mm rope for the main spiral and 4mm rope for any detailing or bordering. Our 3mm flax twine is also a great choice if you wish to add any final touches.
Compared to the rope mirrors found in home stores, these ropes all come with a comparably small and affordable price tag. So, what are you waiting for? Just pop them in your basket, checkout, and get started on your new home accessory.
And remember, if you’d like further guidance on how to make a nautical rope mirror – or have a question about the products in our store – you’re always welcome to get in touch. We’re happy to help in any way we can and can advise on the best rope for your project. Send an email to info@ropesdirect.co.uk and we’ll get back to you as soon as we can.

