Want to infuse a little boho style into your festive decorations?
This magical macramé Christmas tree is perfect. A quick and easy project, even for absolute beginners. It’s made using just one basic macramé knot – the square knot – and can be whipped up in less than an hour. Which means there’s plenty of time to have a go before the 25th.
So why not put on your Christmas playlist, stock up on some of our cotton rope, and start knotting?
What will I need?
- Macrame cord (4mm)
- Wooden beads (16mm)
- Scissors
- Large embroidery needle
- Embroidery thread
- Tacky glue
The square knot – the only knot you need
As complex and impressive as this macramé Christmas decoration may look, it’s surprisingly straightforward to make – as it just consists of a strand of square knots.
The square knot is one of the most simple yet versatile macramé knots, and it pops up in most patterns – so it’s a good one to learn. With a little practice (and patience), even if you’ve never macraméd before, it’s pretty easy to get the hang of.
For ease of explanation, we will refer to the cotton ropes as A, B, C and D from left to right.
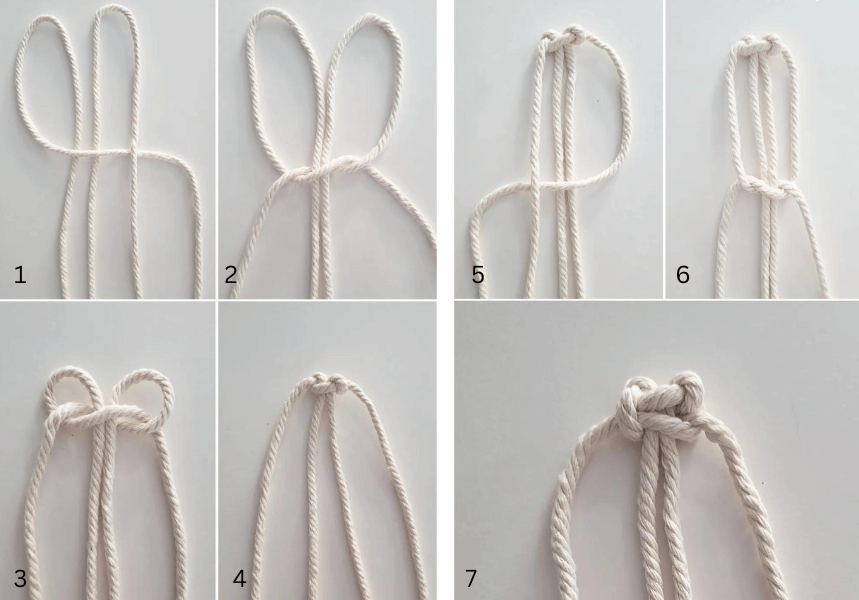
- Cut two 3m lengths of RopesDirect macramé cord.
- Fold both cords in half and lay them next to each other. Then adjust the lengths of each side – so that the inside lengths measure approximately 60cm and the outside lengths roughly 240cm.
- Take rope A and fold it over rope B and C and under rope D. Next, take rope D and run it under rope A, followed by C and B – coming back out through the opening on the left-hand side.
- Pull both A and D tightly. If the knot looks like the shape of a pretzel, you’re on the right track.
- Now, do exactly the same thing, but start on the right-hand side instead. Take rope D and fold it over ropes C and B and under rope A. Then, take rope A under rope D, followed by B and C.
- Pull both sides tightly.
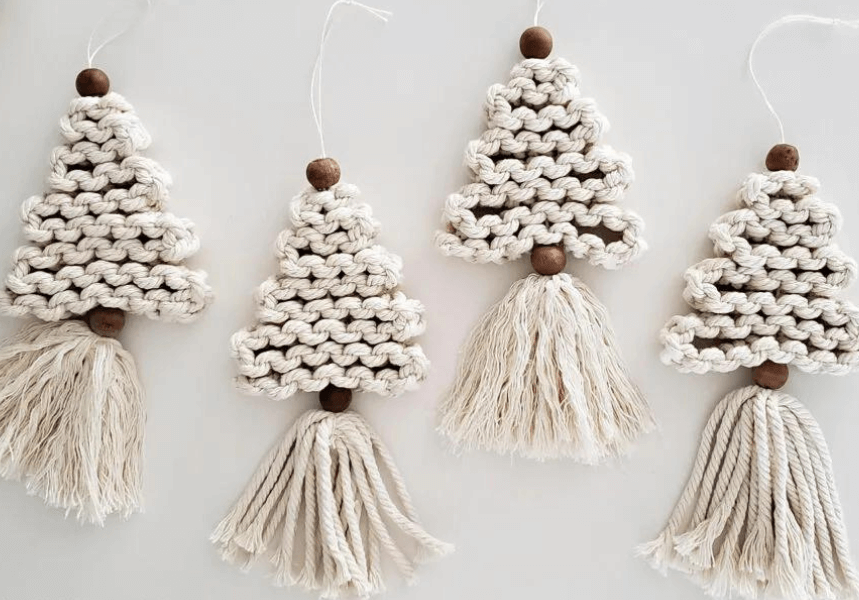
Our simple macramé Christmas tree tutorial
You’re just three steps away from your festive knotted ornaments.
Step 1 – Make a square knot chain
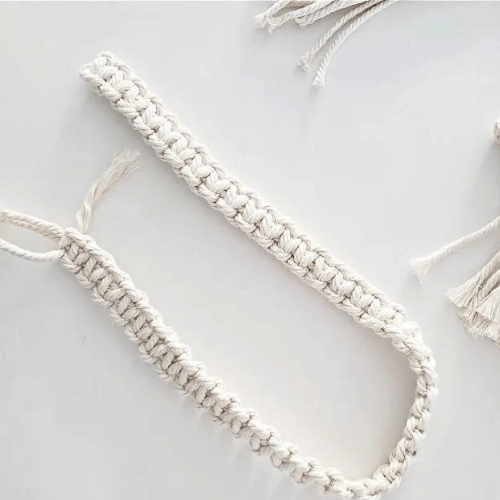
Time to put your new skill – how to make a square knot – into action.
To create the main triangular section of your macramé Christmas tree, simply repeat the steps above, over and over – until you reach the end of the outside cotton macramé ropes and have a long chain of square knots. Try to maintain the same size and tension for each individual knot.
For beginners, it may be helpful to work at a tabletop. Just secure the top of the chain to the table with tape and this should make it easier to keep track of the knots and move the ropes around.
Step 2 – Create the tree shape
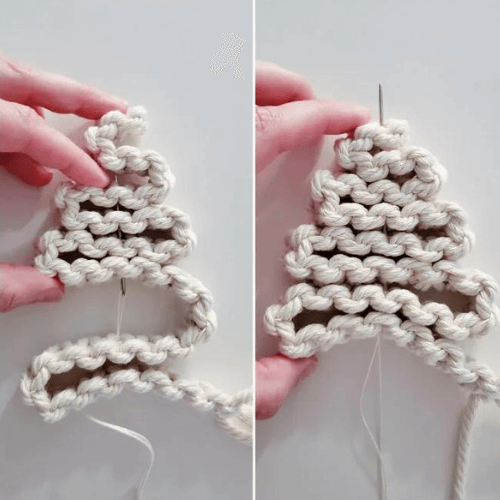
The next step is to turn your chain of square knots into a Christmas tree.
Begin by preparing your embroidery needle. Thread a length of embroidery thread – measuring approximately 70cm long – onto the needle and pull it through so that it’s even on both sides.
Then, from the top, fold the square knot chain back and forth – starting with very small sections and gradually making them larger as you move further down. This should create the triangular shape you’re looking for. Just make sure the end of the chain is at the bottom edge of the tree.
To secure this shape in place, work the embroidery thread up through the centre of the piece – pulling things in tightly. Before cutting the thread and tying a final overhand knot at each end. If you’d like to add wooden beads, make sure these have been threaded before tying the knots.
Step 3 – Finish with a fringe
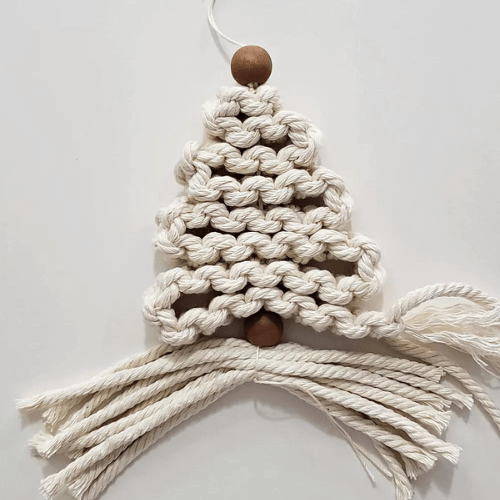
The final section of the project is the fringe. For this, start by cutting 10 pieces of cotton rope that measure approximately 15cm long.
Separate the two strands of embroidery thread at the base of the Christmas tree. Lay the pieces of cotton macramé rope between them – taking care to position them correctly – and tie a little knot in the thread to keep everything securely in place. Then, all that’s left to do is tidy things up.
You can either leave the fringe exactly as it is. Or use a fine-tooth rat tail comb to separate the individual strands and create a fluffier look. Either way, finish by snipping off any uneven ends.
It’s also worth cutting off the ends of the square knot chain and adding a couple of drops of tacky glue to stop them from unravelling.
Enjoy the magic of macramé this Christmas
Whether you’re completely new to macramé or a rope craft connoisseur, a super cute macramé Christmas tree is the ideal project to get you into the festive spirit.
This beginner-level pattern was taken from awonderfulthought.com. But there are lots of options available online, with something to suit all abilities and preferences. So why not find the right one for you, treat yourself to some new macramé cord and start knotting?
Here at RopesDirect, we recently introduced a new line of coloured cotton ropes to our collection. Crafted from 100% natural cotton and measuring 4mm in diameter, these are perfect for this type of festive macramé project. We have a selection of colours to choose from, including yuletide shades such as red, forest green, optic white, silver grey and York gold. All of which are available for just £8.88 for a 25m hank and £30.60 for a 100m reel (December 2023).

Got a question?
Whether you’d like further details on how to make a macramé Christmas tree, need more information on our coloured macramé ropes or are curious about the other rope craft materials for sale in our store – you’re welcome to contact us at any time.
And keep in mind, if you do have a go at making any macramé Christmas decorations using our cotton rope, we’d love to see the results. Feel free to tag us in your photos on social media using @RopesDirect. Or for a chance to feature in our blog, send them to info@ropesdirect.co.uk.

